Shopify Installation Document
Follow the steps below to create and configure the SaaStify Edge Suite Shopify App.
1. Log in to Shopify Admin
-
Open: admin.shopify.com
-
Enter your login credentials.
-
Once logged in, you will be redirected to the Shopify Home page.

2. Navigate to App Development Section
-
On the left sidebar, click Settings (bottom-left corner).
.png)
Inside Settings, look for the Apps and sales channels section or directly the App development option on the right side.
.png)
Click Develop Apps.
.png)
3. Create a New App
Click the Create app button at the top-right corner.
.png)
-
Enter the following details:
-
App Name: SaaStify Edge Suite
-
App Developer Email: apps@saastify.ai
-
Click Create app to proceed.
.png)
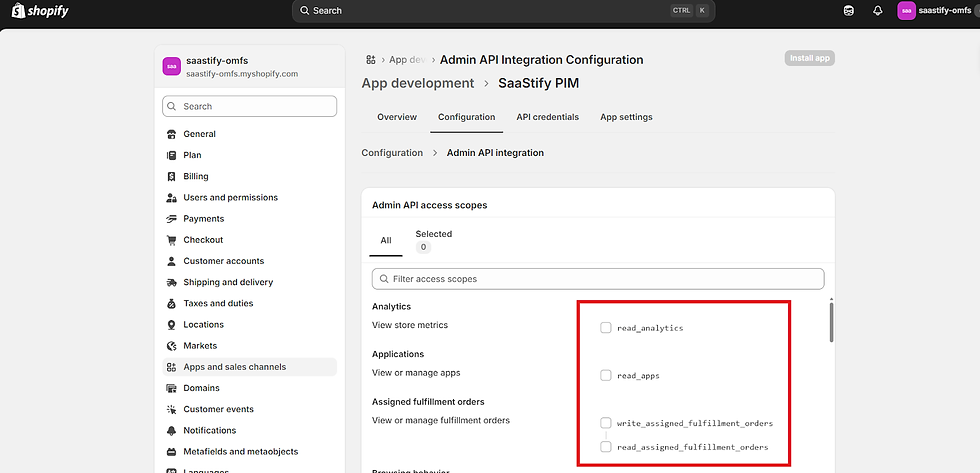
4. Configure Admin API Scopes
-
Once the app is created, you will be taken to the app configuration page.
.png)
Select Configure Admin API scopes.
.png)
Enable the following permissions (scopes): set Imports to read-only and set Imports & Exports to read and write.
-
Analytics
-
Applications
-
Assigned Fulfillment Orders
-
Discounts
-
Discovery
-
Draft Orders
-
Files
-
Fulfillment Services
-
Gift Card Transactions
-
Gift Cards
-
Inventory
-
Legal Policies
-
Locations
-
Metaobject Definitions
-
Metaobject Entries
-
Online Store Navigation
-
Online Store Pages
-
Order Editing
-
Orders
-
Price Rules
-
Product Feeds
-
Product Listings
-
Products
-
Publications
-
Purchase Options
-
Reports
-
Sales Channels
-
Shipping
-
Shop Locales
-
Shopify Marketers
-
Store Content
-
Translations
-
Validations
After enabling all required scopes, click Save.
.png)
5. Install the App
At the top of the page, click API Credentials.
.png)
-
You will see an option called Install app.
-
Click Install app.
-
After installation, the page will display the required credentials:
-
Admin API Access Token
-
API Key
-
API Secret Key
-
Share these three credentials with us for integration.
.png)
.png)
Setup Completed
-
Your Shopify app setup is now complete, and the required credentials are ready to be shared.